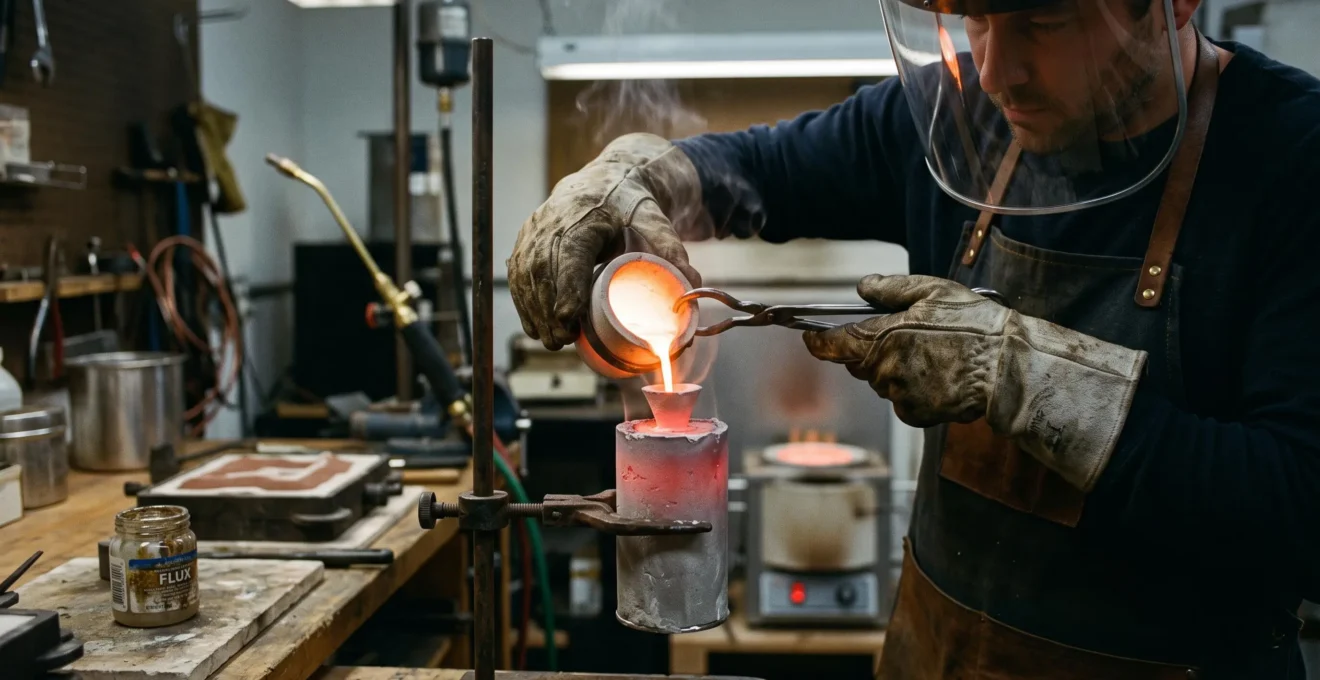
A cast ring can look flawless when it leaves the mould yet crack during stone setting. Another piece may survive finishing but reveal tiny pits after polishing. Both problems can begin before the metal enters the mould, when pouring temperature, alloy condition and flask temperature are not properly controlled.
Metal pouring temperature affects strength and surface finish because it influences mould filling, gas-related defects, oxidation and solidification. Pouring too cold can prevent molten metal from reaching narrow sections. Excessive heating can increase oxidation or contribute to porosity, depending on the alloy and casting conditions. A smooth exterior does not necessarily mean a sound internal structure.
For hobbyist casters and small jewellery studios, the solution is not simply to heat the metal more or purchase a more expensive furnace. It is to establish repeatable melting conditions, use clean stock, control mould preparation and identify defects before finishing hides the evidence. These practices also help buyers understand why two visually similar cast pieces may perform differently in everyday wear.
Metal pouring temperature: the essentials
- Use the lowest suitable metal and flask temperatures that consistently fill the mould for the chosen alloy and casting setup.
- Control moisture, contamination, oxidation and remelting alongside temperature; each can introduce defects independently.
- Record repeatable casting conditions and inspect critical sections before committing time to polishing, setting or assembly.
- Why Can Overheating During Pouring Create Hidden Weakness Even if the Cast Looks Fine?
- How to Stabilise Your Metal Pouring Results Using 3 Consistency Checks
- Torch Melt or Induction Melt: Which Should You Choose if You Cast Weekly?
- The Safety Shortcut That Causes Most Metal Pouring Accidents in Home Workshops
- When Should You Pour Multiple Casts in One Session to Avoid Temperature Drift Defects?
- Why Does Contaminated Metal Stock Create Pitting That Polishing Can’t Fix?
- How to Alloy Metals More Consistently Using a Simple Batch-Control Routine
- Why Can Molten Alloys Produce Slightly Different Gold Colours Between Two « Identical » Batches?
Why Can Overheating During Pouring Create Hidden Weakness Even if the Cast Looks Fine?
Overheating can weaken a casting without producing obvious exterior defects because excessive thermal exposure may increase gas-related porosity, oxidation and alloy-composition changes. Some alloys also become vulnerable to unfavourable grain structures or grain-boundary defects. These problems can remain concealed until the piece is filed, bent, resized or subjected to normal mechanical stress.
Molten metal does not become stronger simply because it flows easily. Increasing its temperature beyond what is required to fill a mould can introduce additional risks. Gas behaviour, oxide formation and solidification conditions all depend on the alloy and the casting system.
Gas porosity can form when gases present in the molten metal become less soluble during solidification and create cavities. Not every gas pore is caused by overheating: contaminated stock, unsuitable melting conditions and inadequate mould preparation may contribute as well.
Some alloying elements are especially sensitive to repeated heating. Zinc can be progressively lost during melting or remelting, changing the original alloy composition. Excess silicon in certain precious-metal alloys can encourage coarse grains and grain-boundary cracking. Grain coarsening, however, should not be assumed to result from overheating in every alloy.
The practical distinction is between visible casting defects and concealed structural defects. Misruns, rough surfaces and casting flash may be visible immediately. Internal porosity or local brittleness may become apparent only when the casting is machined or stressed.
Rio Grande‘s technical instructions on casting metal directly onto stones emphasise using carefully controlled metal and flask temperatures, keeping them as low as practical while still achieving complete mould filling. The document’s specific temperature guidance concerns its described jewellery casting application and is not a universal setting for every alloy.
Once a casting has cooled and is safe to handle, a preliminary inspection can reveal warning signs before polishing:
- Examine thin sections, prongs and the shank under magnification for cracks, cavities or irregular surfaces.
- During planned sprue removal or finishing, inspect freshly exposed metal for pinholes and inclusions.
- Check the sprue head and adjacent feed regions for visible shrinkage cavities or depressions.
- Compare suspect sections with a known acceptable casting from the same alloy and process.
A light drawdown or flexing check on a thin section, a scratch near the pour point, or a small file test may reveal a problem, but these are not validated methods for proving internal soundness. Flexing can also damage delicate castings. Critical jewellery components may require professional inspection or appropriate non-destructive testing.
Buyers have a reason to care about this invisible quality difference. A ring that looks acceptable in the display case may still be vulnerable during resizing or stone setting if its structure contains defects.
Preventing this uncertainty starts with controlling the melting process rather than relying on inspection after defects have already formed.
How to Stabilise Your Metal Pouring Results Using 3 Consistency Checks
More consistent metal pouring starts with three recorded checks: repeatable heating behaviour, suitable melt-surface protection and verified mould temperature. Together, these controls help identify changing conditions between pours. They do not replace accurate temperature measurement, but they provide a practical framework for workshops where sophisticated monitoring equipment is unavailable.
Using the same torch setting or furnace programme does not guarantee the same result. Charge weight, crucible condition, starting temperature, mould condition and ambient workshop conditions can all affect the process.
Three checks give a small studio useful reference points.
- Heating performance. For the same alloy, charge weight, crucible and equipment, record the time needed to reach a defined melt condition. A substantial change may indicate altered heating performance, although melt time alone cannot establish actual metal temperature.
- Melt-surface protection. Check whether the chosen flux, cover or protective atmosphere is appropriate for the specific alloy and melting method. Charcoal is not universally suitable, and excessive or contaminated flux can introduce problems. Record the selected protection method and any unusual oxide or slag formation.
- Mould temperature and readiness. Verify flask temperature with a suitable probe or instrument using the alloy and investment manufacturer’s instructions. Never touch a hot flask to judge its temperature. Confirm that the mould has completed the required drying or burnout cycle before pouring.
These checks work best against a documented baseline rather than an assumed ideal setting. A flask stored in a cold, humid workshop may behave differently from one prepared under controlled conditions. Likewise, a worn crucible may alter heat transfer or introduce contamination.
A compact casting log is sufficient for initial troubleshooting:
| Control | What to record | What changes may indicate |
|---|---|---|
| Heating | Alloy, charge weight, melt time, measured temperature if available | Heating variation or changed melt conditions |
| Protection | Flux or atmosphere, crucible condition, visible oxides | Oxidation or contamination concerns |
| Mould | Flask temperature, burnout cycle, investment age or condition | Different filling or gas-release conditions |
| Result | Misruns, visible pits, roughness, inspection findings | Patterns requiring investigation |
Consider a hypothetical workshop that records increasingly long melt times while charge weight remains unchanged. That pattern does not prove a temperature problem, but it provides a reason to inspect heating equipment before blaming the alloy.
The objective is repeatable conditions supported by measurements, not identical-looking flames or arbitrary heating times.
Once the basic controls are established, the next question is whether the workshop’s melting equipment supports the level of repeatability its production schedule requires.
Torch Melt or Induction Melt: Which Should You Choose if You Cast Weekly?
For weekly jewellery casting, torch melting is often attractive for small charges, flexible bench work and low initial equipment investment. Induction melting becomes more appealing when repeatability, controlled heating and frequent production cycles matter. Neither method guarantees defect-free castings, and the appropriate choice depends on alloy compatibility, workload, temperature monitoring and operating costs.
A torch gives the operator direct visual access to the melt and considerable flexibility. However, heat distribution, flame chemistry and exposure time depend heavily on technique.
Induction systems heat conductive material through electromagnetic induction. Depending on the equipment, they may offer repeatable heating programmes, temperature monitoring and protective-atmosphere options. Those capabilities should not be assumed to exist on every compact workshop unit.
The following comparison focuses on practical workshop decisions rather than a universal ranking.
| Decision factor | Torch melting | Induction melting |
|---|---|---|
| Initial investment | Generally lower for a basic setup | Generally higher, depending on controls and capacity |
| Portability | Flexible for suitable small-workshop setups | Dependent on electrical supply and equipment installation |
| Operator dependence | Strong reliance on flame control and visual judgement | Potentially more repeatable with suitable instrumentation |
| Oxidation exposure | Depends on flame chemistry, duration and protection | May be reduced with appropriate atmosphere control |
| Production cycles | Practical for occasional or small charges | Can suit repeated charges within rated capacity |
| Ongoing requirements | Fuel, torch maintenance, crucibles and ventilation | Electricity, crucibles, maintenance and possible cooling systems |
| Training | Flame adjustment and melt recognition | Equipment setup, control calibration and operating procedures |
Weekly casters often notice the difference most clearly in their ability to reproduce melting conditions. Torch operation can become consistent with experience, but it remains sensitive to operator technique. A suitably controlled induction unit can reduce some sources of variability without eliminating the need for correct flask preparation and alloy handling.
Hoover & Strong’s technical discussion of casting-grain manufacturing describes induction melting under controlled reducing conditions in an industrial context. That experience demonstrates the importance of atmosphere and composition control, but it is not direct comparative evidence for all small induction furnaces.
When estimating the total cost of either method, include crucible replacement, utilities, consumables, maintenance, scrap losses, operator time and the actual production volume. A low purchase price may be less important than the cost of rejected castings.
A hybrid workflow can be appropriate: torch melting for one-off prototypes and a controlled furnace or induction unit for recurring production. The transition makes sense when documented variation, throughput or labour requirements justify the change.
Regardless of the melting method, the most important operating decision remains the same: no production schedule justifies overlooking molten-metal safety.
The Safety Shortcut That Causes Most Metal Pouring Accidents in Home Workshops
One of the most dangerous shortcuts in a home casting workshop is allowing moisture to contact molten metal. Water trapped in a crucible, tool, charge or mould can rapidly turn to steam and violently eject molten material. Moisture is a documented serious hazard, although available evidence does not establish that it causes most home-workshop casting accidents.
The danger is not simply that water cools hot metal. Rapid steam generation can create pressure and propel molten metal beyond the immediate pouring area.
On 7 March 2018, a worker at an industrial aluminium die-casting foundry was severely burned after a moisture-contaminated ladle entered molten aluminium. The OSHA accident report on moisture-related molten-metal ejection records second- and third-degree burns requiring hospitalisation.
This incident involved industrial aluminium casting, not jewellery casting. Nevertheless, it illustrates a physical hazard relevant wherever water can contact molten metal. A single incident cannot establish accident frequency or identify the leading cause of injuries in home workshops.
Documented safety incident: moisture on a ladle
In a US aluminium die-casting foundry, a worker was preparing to immerse a hand ladle in a furnace. Moisture remained on the ladle when it contacted the molten aluminium.
The resulting steam-related eruption expelled molten metal and caused severe burns. The incident demonstrates the seriousness of moisture contamination, but does not quantify how commonly this occurs in jewellery workshops.
Small shortcuts can combine to increase exposure: failing to dry equipment according to its instructions, using unsuitable or damaged crucibles, introducing damp scrap or tools, and allowing casting materials to absorb moisture during storage.
Cold garages, condensation around stored equipment and nearby water sources deserve particular attention. Moisture inside gloves or on clothing is another hazard around molten metal.
Personal protective equipment is the final protective layer, not a substitute for prevention. Appropriate face, eye, body, foot and hand protection should be selected for molten-metal exposure, but effective risk control begins with keeping moisture and unsuitable materials out of the process.
Preheating and drying must follow the crucible, investment and equipment manufacturers’ procedures. An apparently dry surface does not guarantee that moisture is absent internally, and visual inspection cannot replace a validated drying cycle.
Five verifiable checks before a molten-metal pour
- Inspect the crucible for damage and confirm its approved preparation procedure has been completed. Record the inspection and preparation status.
- Verify that the mould has completed the specified drying or burnout cycle. Keep the completed cycle record.
- Check metal stock, additions and tools for moisture or contamination, and confirm approved preparation where required. Mark the charge as ready only after verification.
- Inspect protective equipment, the pouring area and the designated safe route. Complete a signed or dated safety check.
- Confirm functioning ventilation, a clear exclusion zone and an appropriate emergency plan before energising melting equipment. Record the pre-pour authorisation.
Damaged crucibles, unknown materials, inadequate ventilation or uncertain equipment conditions are reasons to stop the operation and obtain appropriate technical guidance. Water must never be used to address a molten-metal spill.
A safe process also needs a realistic production schedule, since rushed preparations and repeated interruptions can undermine both safety and casting consistency.
When Should You Pour Multiple Casts in One Session to Avoid Temperature Drift Defects?
Multiple castings can be more consistent when moulds, equipment and metal charges are prepared under comparable conditions during a controlled session. However, batching is beneficial only if the alloy remains suitable for pouring and the equipment can maintain the required process conditions. Prolonged molten-metal holding may increase oxidation or change alloy composition.
One-off pours separated by long intervals require equipment to return repeatedly to an operating state. Starting conditions may change with crucible temperature, furnace behaviour and flask preparation.
Grouping compatible work can reduce some of these differences, particularly when moulds follow the same validated burnout programme and reach the appropriate casting temperature within a controlled window.
That does not mean every casting in a long session will have the same temperature. Flask cooling rates, delays between removal and pouring, charge weight and metal-transfer time still matter.
Three questions help establish whether grouping pours is appropriate:
- How sensitive is the alloy to holding? Alloys containing oxidation-sensitive or potentially volatile constituents may be less tolerant of extended exposure.
- How quickly do the flasks change temperature? Smaller or differently shaped moulds can lose heat at different rates after removal from controlled equipment.
- Can each charge be prepared consistently? Repeatedly topping up or remelting an existing bath is not equivalent to preparing separately documented charges.
For an illustrative small-studio workflow, several compatible moulds might be prepared together, while individual metal charges are melted only when the corresponding flasks are ready. This is a planning example, not a prescribed casting schedule.
The opposite approach—keeping a single molten batch hot throughout a long production session—can create avoidable exposure to oxidation and potential composition drift. The suitable holding time depends on the alloy and the equipment manufacturer’s recommendations.
A useful division of work is to group pattern preparation, investment mixing and documented burnout operations where practical. Melting and pouring should remain tied to each flask’s actual readiness and the alloy’s permitted conditions. Cleanup can be consolidated once castings are safely cooled.
Stop a batch when temperature measurements become unreliable, oxide formation changes unexpectedly or the safe operating window cannot be maintained.
Even a well-timed production session will struggle to produce sound metal if the charge contains contamination carried over from earlier work.
Why Does Contaminated Metal Stock Create Pitting That Polishing Can’t Fix?
Contaminated casting stock can produce pits that polishing cannot eliminate because foreign material, oxides or gas-generating residues may become trapped inside the solidifying metal. Polishing only removes the outer surface. If cavities or inclusions extend beneath that surface, further abrasion can reveal additional defects instead of producing a permanently smooth finish.
Common contamination risks include solder residues, investment fragments, machining oils, mixed-alloy scrap and repeatedly remelted stock of uncertain composition.
During melting, some contaminants may release gas, form non-metallic inclusions or alter the chemistry of the alloy. These mechanisms can contribute to cavities, brittle regions and visible surface imperfections.
The investment-casting defect troubleshooting chart hosted by Ganoksin identifies several relevant contributors to porosity and cracking, including overheated metal, contaminated remelt material, old crucibles, poor burnout and inadequate sprue design.
It is important not to diagnose contamination solely from the appearance of a pit. Gas porosity, shrinkage porosity, investment-related defects and inclusions can produce overlapping visual symptoms.
Location may help guide an investigation, but pits in thin sections or last-to-fill regions do not automatically prove contaminated stock. Mould temperature, feed geometry and burnout conditions must also be considered.
The most effective stock-control discipline starts before melting:
- Keep new, identified casting grain separate from recycled material.
- Label every container with alloy identification and known provenance.
- Separate sprues and returns by documented batch wherever possible.
- Exclude unknown soldered scrap, mixed-alloy material and contaminated returns from critical batches unless properly processed and verified.
- Inspect and maintain crucibles according to manufacturer requirements.
For buyers, a useful question is whether the workshop uses new casting grain, controlled returns or professionally refined recycled material. Recycled stock is not inherently defective; its provenance, cleanliness and composition control determine whether it is suitable.
When an inclusion or cavity is suspected, removing more material is not always a sensible repair. The remaining section may be compromised, particularly around ring shanks, claws and other stressed features.
Once raw-material quality is controlled, the next challenge is making sure every batch contains the intended alloy constituents in the correct proportions.
How to Alloy Metals More Consistently Using a Simple Batch-Control Routine
Consistent alloying requires accurately weighed components, documented material origins and a unique batch record that follows the metal through melting and reuse. This prevents unknown scrap additions and repeated remelts from silently changing the formulation. Small studios can improve traceability without owning laboratory assay equipment, although records alone cannot confirm chemical composition.
Estimating an alloy by eye is particularly risky when small additions influence colour, oxidation behaviour or mechanical performance. A mixture that appears similar to an earlier batch may not have the same chemistry.
Hoover & Strong‘s Understanding Casting Grain technical article explains the roles of silver, copper, zinc and silicon in precious-metal casting alloys. It also discusses chemical control, contamination, mixing and the quality-assurance challenges involved in producing consistent casting grain.
A practical batch-control routine rests on three principles.
- Weigh before melting. Use a suitable calibrated balance and a documented formulation. Record each component separately, including any permitted additions.
- Record the source and assumed composition. Identify new metal, master alloys and recycled returns. Unknown material should not be assigned an invented composition.
- Track each batch and remelt. Allocate a unique identifier, document the remelt history and keep relevant observations or inspection results associated with the same batch.
A basic record might contain these fields:
| Field | Information to retain |
|---|---|
| Batch identifier | Unique code linked to the casting job |
| Target alloy | Approved formulation or supplier designation |
| Charge composition | Recorded masses and known source materials |
| Returns | Original batch identity and documented remelt history |
| Processing | Melting equipment, relevant settings and observations |
| Inspection | Visible defects, finishing observations and retained sample |
Melting losses cannot be assumed to follow a universal percentage. They depend on material, temperature, atmosphere and process. Any proposed loss allowance needs supporting records and, where accurate composition matters, suitable analytical verification.
The same limitation applies to weighing. A correctly measured charge can still finish outside its intended composition if constituents oxidise, evaporate or are lost in slag.
Commercially prepared casting grain can reduce some formulation uncertainties, but its specifications and suitability still need checking. For critical jewellery or hallmarking requirements, appropriate assay and applicable standards remain relevant.
A retained, labelled sample can help the workshop compare appearance between batches and assess future repairs. It is useful evidence of consistency, not a substitute for an assay.
The commercial benefit becomes especially clear when a customer expects a new component to match an earlier piece in both material specification and visible gold colour.
Key takeaways before colour matching
- Preserve alloy provenance and remelt history before combining returns with new metal.
- Investigate composition and finishing separately when two pieces show different colour.
- For matching repairs or sets, retain a documented reference batch and a finished comparison sample wherever practical.
Why Can Molten Alloys Produce Slightly Different Gold Colours Between Two « Identical » Batches?
Two nominally identical gold-alloy batches can produce slightly different colours when their actual silver, copper or other alloying-element proportions differ. Repeated melting, selective oxidation and contamination may change composition. Surface finishing, coatings and microstructural differences can also influence appearance, so a colour mismatch does not necessarily prove that the base alloy formulation changed.
Gold colour is strongly influenced by the relationship between its principal constituents. Different proportions of silver and copper can produce visibly different tones even when the alloys share the same nominal gold fineness.
Small additions such as zinc and deoxidisers also affect melting behaviour and chemical stability. Zinc loss during remelting can shift the composition away from the original formulation. This is one reason that simply weighing an old sprue against new metal does not guarantee identical results.
However, not every remelt produces a noticeable colour change. The outcome depends on the alloy, melting atmosphere, temperature history, remelt conditions and proportion of recycled material.
There is also an important distinction between bulk alloy colour and apparent surface colour.
- Composition-related variation: changes in the relative proportions of alloying elements can alter the underlying material colour.
- Oxidation-related variation: surface oxides and chemical reactions may change the appearance of newly cast or processed metal.
- Microstructural effects: cooling history can influence structure and surface behaviour, although its independent contribution to visible colour depends on the particular alloy and conditions.
- Finishing-related variation: different polishing, pickling, surface preparation or plating treatments can make similar base alloys look different.
Before changing a melt formulation, compare samples after equivalent finishing and under consistent lighting. A highly polished component and a matte-cast component may look different even when their underlying chemistry is the same.
The difficulty becomes greater for matched jewellery sets and repairs. A new ring component, clasp or pendant element may need to match an existing piece that has experienced wear, polishing or surface treatment.
For this work, the most reliable practical strategy is to preserve the original batch identification, use verified compatible material and retain a reference sample whenever possible. Where a precise match matters, appropriate composition testing and controlled finishing may be needed.
For buyers, a slight colour difference is not automatically evidence of poor manufacture. It is a reason to ask about alloy identification, batch history and finishing methods before drawing conclusions.
Before starting a matched set or repair, document the original material specification and finish, confirm the proposed casting stock, and agree how the finished components will be compared. Preventing an avoidable mismatch is generally more practical than correcting one after assembly.
Can a jewellery casting be internally porous even if its surface is smooth?
Yes. Internal gas or shrinkage porosity may not reach the visible surface. Filing, machining or subsequent mechanical stress can expose defects that were not obvious in the original casting. Surface inspection is useful, but it cannot establish complete internal soundness.
Is there one correct pouring temperature for all gold and silver alloys?
No. Suitable pouring temperature depends on the specific alloy, its melting range, casting geometry, mould conditions and equipment. Manufacturer guidance and validated workshop procedures should determine the starting settings. A temperature recommended for one alloy or casting method should not automatically be transferred to another.
Can an infrared thermometer accurately measure molten metal temperature?
Only if the instrument, measurement range, emissivity assumptions and measurement method are suitable for the molten material. Reflective metal surfaces can make infrared readings unreliable. Use equipment specifically appropriate for the alloy and process, following the instrument manufacturer’s guidance.
Should a small studio reuse sprues and other clean casting returns?
Reuse may be appropriate when the alloy identity, contamination condition and remelt history are controlled and the material supplier’s recommendations permit it. Repeatedly remelting unidentified returns increases uncertainty. Clean appearance alone does not verify alloy composition.
Does better pouring temperature control eliminate the need for casting inspection?
No. Temperature is only one variable. Contamination, inadequate burnout, mould design, feeding, oxidation and alloy preparation can also produce defects. Repeatable process control reduces avoidable variation, while inspection helps identify defects that still occur. The inspection method should reflect the component’s intended function and risk.